%20-%20icon.svg)


.svg)

.svg)

.svg)


.svg)


D
ocker is already popular, and with the explosive growth of Kubernetes, it's not going anywhere anytime soon. When working with Docker, many people think containers are not worth investigations—but in fact, nothing could be farther from the truth.
Containers can be broken out of with misconfigurations, and in today’s blog, we’ll be going over an example of how to make it happen! Let’s dive right in:
What is Docker?Docker is designed to simplify the complexities of application development through a set of platform as a service products. These products leverage OS-level virtualization to deliver software in packages, referred to as containers.
Containers are isolated from one another and bundle their own software, libraries, and configuration files. They’re designed to communicate with each other through well-defined channels.
Docker Top
When working with Docker, you often want to know what's happening inside your container. The good news is that Docker Top is here to help. You can even change the output via the standard flags used in ps:
docker top $CONTAINER_ID -o start,user,pid,cmd
Here is an example of Docker Top running. Can you spot the rouge programs running?

Docker Diff
Docker Diff can be a really good way to find out what's changed inside an image since it started. The command is simple but powerful! Note that you this might give you a ton of output, so you might want to save this command’s output via a redirect like so:
docker diff $CONTAINER_ID > changed_files.txt
Docker Diff not only shows you what's changed, but also how they have changed. See below:
- D - Deleted File
- C - Changed File
- A - Added File
Going back to our infected container example, we can see some strange file activity.
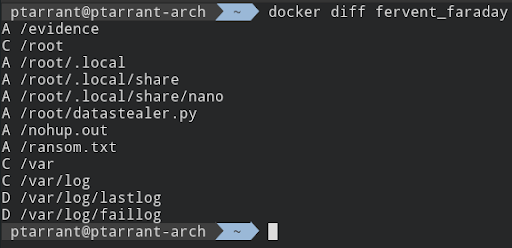
We have the deletion of /var/log/lastlog and faillog. We see a python script with the most unimaginative name ever (Datastealer). Finally, we also see some new files in /root which are notated with "A" for Added. This container has something weird going on....no doubt... so next, let's look into the logs…
Docker Logs
Docker has a great way to see all logs that are happening on the system. The "Docker Logs" command is simple yet very powerful. It not only shows the standard output on the screen, but also any relevant logs such as nginx logs, and the like. It's syntax is below:
docker logs $CONTAINERID
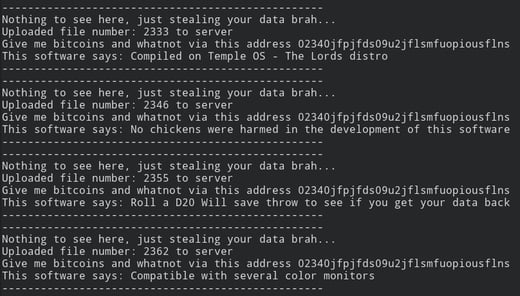
Getting back to our obviously owned container, we see some concerning output on the screen inside the container.
Docker Commit
Saving Docker evidence isn’t something most people know how to do. Docker Commit is a great little command that will save the current state of a container, including all the changes to a new image. This is extremely helpful as it saves what might have happened or changed by an attacker should they have any evidence on the file system.
docker commit $CONTAINER_ID $NEW_IMAGE_NAME
Let’s not forget about comments and metadata! You can do that while saving the new image. Here is an example of a comment.
docker commit -m "Collected by Compuquip" $CONTAINER_ID $NEW_IMAGE_NAME
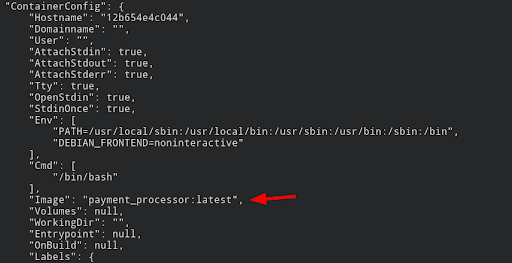
Let’s also inspect the container with the Docker command docker inspect $CONTAINER_ID in order to view the original image it came from and help preserve chain of custody.
Docker Export
Now that the container is saved, let’s export it in a usable format. Let’s also hash the file to verify its integrity when copying it to other media. Docker Export basically just makes a tar archive of the image to be imported later:
docker export $CONTAINER_ID > evidence_image.tar
sha256sum evidence_image.tar > evidence_hash.txt
Log2Timeline
The only thing missing from Docker Diff is the times when these files were edited. For that, we have to use Log2Timeline (Plaso). Note this will only have one worker, and since the image has to be streamed through memory to view, it’s very slow.
log2timeline.py --process_archives evidence.plaso evidence.tar

You can use something like ratarmount to mount the tar file as a read only file system, which can then be targeted by Log2Timeline for faster results.
Here is how to do it.
pip install ratarmount ← *note, this must be Pip3 as Python2 is depreciated.
mkdir -p /evidence/mount
ratarmount evidence.tar /evidence/mount/
Looking for Guidance as Your Leverage Docker Forensics?
At Compuquip, our mission is to simplify cybersecurity so your business can operate as safely and efficiently as possible. If you need help making the most out of your investment in Docker or are looking for guidance as you break out containers with misconfigurations, we’re here to help. Reach out to our experts today for support!