%20-%20icon.svg)


.svg)

.svg)

.svg)


.svg)


Secure Socket Shell (SSH), or Secure Shell, or as most people call it, is a network protocol that gives users a secure way to access a system, most commonly a server, over a network.
In this post, we’ll cover how to properly secure your SSH!
What is Secure Socket Shell?
In addition to providing secure network services, via an encrypted tunnel, Secure Shell provides strong password authentication and supports public key authentication. Think of it as a remote desktop, but it’s a remote terminal. The SSH server commonly listens on port 22.
Why Must Secure Socket Shell Be Properly Secured?
Now we know what SSH is and a little bit more about how it’s used, you can see the reason for an in-depth guide on properly securing this vital network service. With SSH being so prevalent in the *nix world, internet bots/scripts commonly scan ip’s for port 22 being open. In some cases, you will see connection attempts hundreds of times an hour!
Steps to Securing Secure Socket Shell
1. Moving the Port
So, step one is to move the port to a non-standard port. Like anything in the security world, this simple act will not protect you. Security by obscurity is not a valid option, however, it can be part of a set of controls that together will make your system safer.
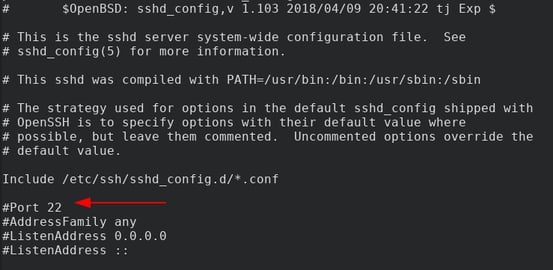
Understand that just changing the port for SSH won’t do anything outside of cutting out a ton of internet bot noise. If someone scans your IP for all ports, they will find it open, and due to banner grabbing, they will know it’s SSH. On your typical Ubuntu/Debian, system sshd_config is the file you want to edit.
Notice in the screenshot below how the port number is commented out. If you remove the leading pound sign (#), you can set the port to whatever you wish. I recommend something under 1024, but not 222 or 2222 as those are common ports as well.
/etc/ssh/sshd_config
2. Key Only Authentication
SSH has the ability to use several different key types for authentication. Some of these have been disabled due to being too insecure. Here is a quick list:
- DSA (No longer allowed by default in OpenSSH 7.0+)
- RSA
- ECDSA (OpenSSH 5.7+)
- ed25519 (OpenSSH 6.5+)
The crowd favorite of the world has been the RSA key pair. Generating an SSH key is as easy as running ssh-keygen. I won’t go into much detail right now, but you can read all about it here. To enable key authentication only, you need to do the following.
1. Add your public key to the file
/home/{username}/.ssh/authorized_keys.
They require this so you don’t lock yourself out of the system. Remember, with public/private keys, exposing your public key is safe.
2. You will then want to change the following lines:
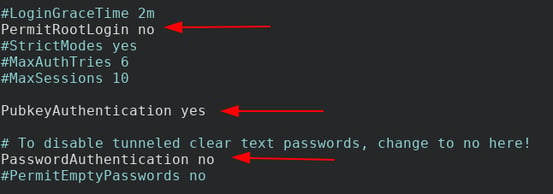
Note that:
- PermitRootLogin is never a good idea. You should login as a user, and then elevate via sudo or su.
- PubkeyAuthentication must be turned on for key logins to work.
- Password Authentication set to no will disable passwords.
3. Fail2Ban
You could technically leave the config there, however, if you want to be extra secure, you can install and set up Fail2Ban. Fail2Ban is included in most distributions and you can install it normally through your package manager of choice. Fail2Ban setups are called “jails,” and defining one is easy. Let’s create one for SSH!
Open /etc/fail2ban/jail.local in your favorite text editor and paste the following:
[sshd]
enabled = true
maxretry = 3
findtime = 1d
bantime = 4w
ignoreip = 127.0.0.1/8 23.34.45.56
Now, just restart the fail2ban service and you should be good to go!
While most of these values should be self-explanatory, the ignore ip option is very important. You can add multiple ips separated by spaces. Note you use CIDR notation.
4. Unbanning someone
Fail2ban comes with a client named… fail2ban-client. Not the most original name on the block, but easy to remember. To un-ban someone is easy using this command. You can un-ban anyone by simply running this command:
sudo fail2ban-client set sshd unbanip 23.34.45.56
If you wish to ban someone manually, you can do something similar:
sudo fail2ban-client set sshd banip 23.34.45.56
Closing Thoughts
While it’s rare for someone's ssh password to be compromised, it does happen. With tools like Hydra on the loose, it never hurts to be extra careful. We have now shown you several steps to properly secure your SSH daemon from the internet. I personally don’t allow SSH access into my most critical machines from any IP, except a few static IP’s. These IPs are to my bastion boxes (A.K.A. a jump boxes). I then also setup IP tables to drop all traffic except those static IPs. As with any security setup, a multifaceted approach is required to ensure the safety of your servers.
Want us to help set up your server? Looking for guidance when it comes to better securing your organization? We’re here to help! We offer a variety of professional and managed services to safeguard your business from modern cybersecurity threats! Reach out to one of our experts today to get started.