%20-%20icon.svg)


.svg)

.svg)

.svg)


.svg)


Have you ever logged into a Palo Alto firewall cluster, noticed that it tells you the HA status in the prompt and thought: “I wonder why Check Point doesn’t do that?”
We’re here to show you how to make this possible!
What is Check Point?Around the world, Check Point is known as an industry leader in cybersecurity solutions. They have earned a multitude of awards from a variety of organizations, from NSS labs, SC Media, Forrester, Gartner, and more.
Check Point has evolved their threat hunting capabilities to now cover more of what is going on in the world and is continuously adapting to changes in the workforce, including cloud integrations, network and mobile adaptations, and robust endpoint configurations. This vast selection of evolving products and solutions has shaped the cybersecurity industry and prepared it for the next generations of threats.
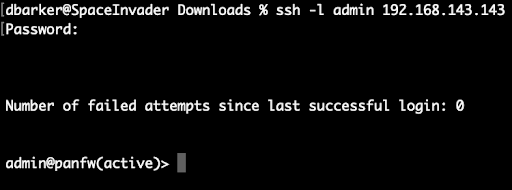
Palo Alto Firewall Cluster Node Example
Here’s an example if you don’t know what I’m talking about. This is what I see when I log into a Palo Alto firewall cluster node:
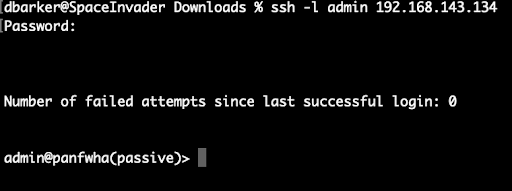
And similarly, if I ssh into the other node, I will see:
CheckPoint Firewall Cluster Node Example
But, if you ssh into a Check Point cluster, you will see the following:
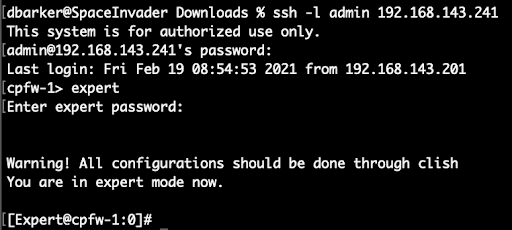
Notice in both clish and expert, you don’t see the cluster status.
Now with some editing of the /etc/bashrc, you can have the following prompt:
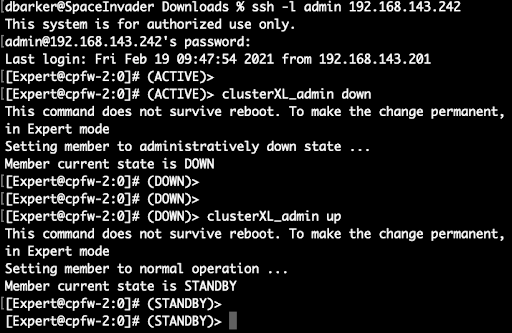
Notice how the prompt changes when we run clusterXL_admin down / up.
This prevents you from having to run cphaprob state every time you login to a firewall to know which one is active.
Editing The Bashrc
Now, how do you edit the bashrc—and more importantly, what exactly do you edit?
In order to do this part, you’ll need a rudimentary knowledge of vi. You won’t need to be a vi expert, but know enough to edit and save files.
First, let's backup the existing bashrc. In order to accomplish this from expert prompt, you will need to do the following:
cp /etc/bashrc /etc/bashrc.orig
Then:
vi/etc/bashrc
Scroll down until you find the following code block:
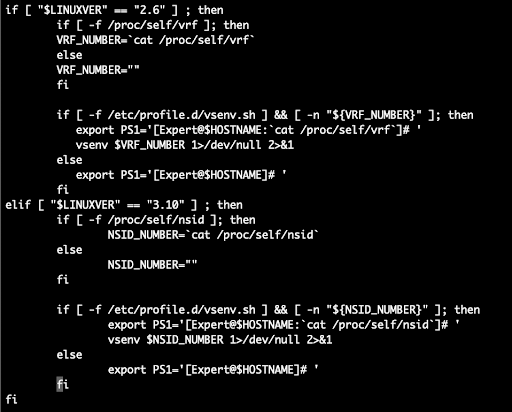
Everywhere you find the phrase export PS1, you’ll need to add the following lines underneath:
PS1+="(\$(/opt/CPsuite-R80.40/fw1/bin/cphaprob state | grep 'local' | awk '{print \$(NF-1)}'))> "
export PS1
Such that the resulting block looks like this:
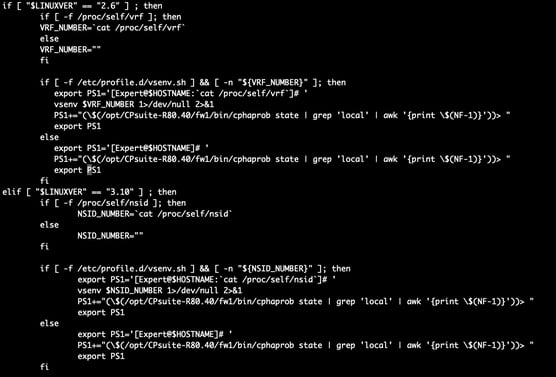
Note in my example, I’m running R80.40 and the command to get the cluster status is
/opt/CPsuite-R80.40/fw1/bin/cphaprob.
If you were running a different version of check point, you can run the command:
which cphaprob
to get the path of the command:

Final Steps
After you’ve made the appropriate modifications to both cluster members /etc/bashrc, you’ll need to logout and login again for the changes to be seen.
There you have it… cluster status right in the prompt! This changes automatically when you failover (note you’ll still need to hit enter or run a command, it doesn’t automatically refresh the screen), but the prompt changes without having to login again.
Need more assistance or guidance as you navigate your Check Point Firewall Cluster? For over 20 years, Compuquip has partnered with Check Point Technologies to provide its community’s next security level. Being a 5-star elite partner has allowed us to understand their fleet of solutions and manage the band of products for our Check Point community. Reach out to one of our Check Point experts today to learn more!